Server to Server Transfers with AoC and Aspera Console
Server to Server Transfers with AoC and Aspera Console
Introduction
Aspera on Cloud (AoC) is a powerful SaaS offering that enables high-speed data transfer using the Aspera FASP protocol without the overhead of maintaining infrastructure and server-side software.
Organizations can upload and download files through the AoC web interface, using built-in storage from IBM Cloud, or by bringing your own cloud object storage, such as AWS S3, Microsoft Azure, or Google Cloud Storage.
Aspera Console is an optional customer-managed web application that includes the ability to trigger server-to-server transfers between Aspera hosts, either ad-hoc or on a recurring schedule.
This article will describe how to use AoC in conjunction with Aspera Console.
Use Case
In this case, we have users uploading content through the AoC web interface. Once finalized, we need to transfer those assets to a partner who is running their own Aspera High-Speed Transfer Server (HSTS). This partner has given us the hostname and a username/password to their HSTS.
It’s possible to trigger this type of server-to-server Aspera transfer using the Node API. In our case, we have an existing Aspera Console deployment and would like to trigger transfers through the web interface for ease of use.
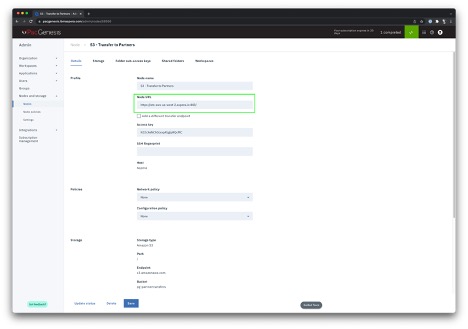
Aspera on Cloud Configuration
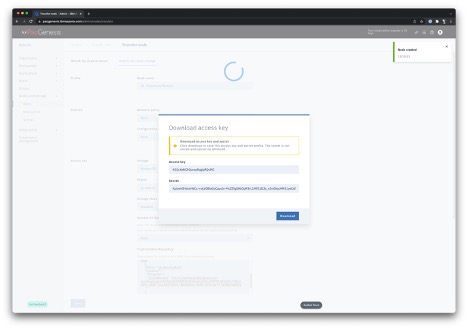
This procedure will use a Node from your AoC organization. For this example, I’ve created a new node for an existing AWS S3 bucket. You will need the Node URL along with the Aspera Access Key and Secret:
Aspera Console Configuration
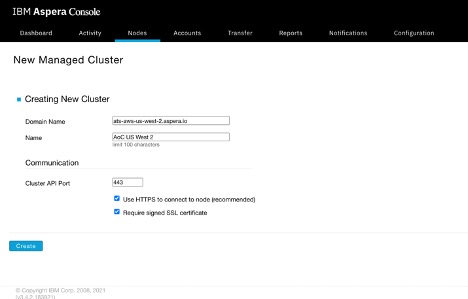
To add your AoC node into Console, navigate to Nodes → New Managed Cluster.
On the next page, fill out the DNS Name from your AoC Node URL and a friendly name:
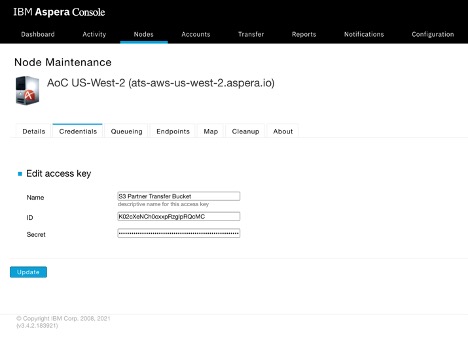
On the next Credentials screen, click Add Access Key, and enter the Access Key ID and Secret from AoC:
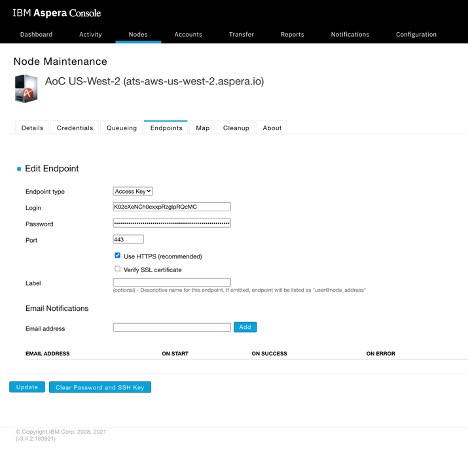
In order to use this access key in Console Transfers, add the access key and secret into the Endpoints tab as well:
Transferring Files
Now that configuration is done, we can create Simple Transfers or Smart Transfers inside of Console. See the Aspera Console Admin Guide for full details.
Here is an example of a Simple Transfer, sending from our AoC Node to an Unmanaged Node of one of our partners.
Navigate to Transfer → Simple Transfer.
In the Source box, choose the saved Endpoint for your node, then click Browse to choose which files/folders to transfer.
In the Destination box, choose one of your Unmanaged Nodes and a destination folder.
You can adjust other settings, such as target rate and email notifications below. When you’re ready, click Transfer.

Back on the Dashboard, you’ll see the transfer job get submitted and can then follow progress.
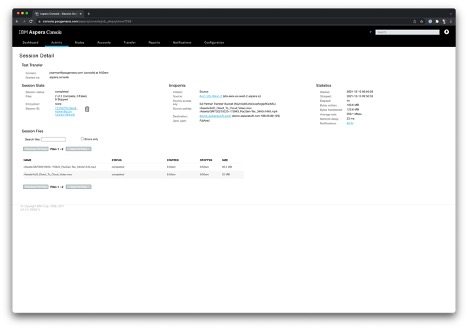
If you click on the transfer session, you’ll be able to see detail about your transfer job. Here is our completed job showing two files being sent from our S3 Node in AoC to our partner’s HSTS:
Learn More
PacGenesis experts are ready to assist with your Aspera workflows.
To learn more about PacGenesis, follow @PacGenesis on Facebook, Twitter, and LinkedIn, or contact us at pacgenesis.com.