Faspex 5 Multiple HSTS Node Configuration

Faspex 5 Multiple HSTS Node Configuration
Attaching multiple IBM Aspera High Speed Transfer Server (HSTS) nodes to the IBM Aspera Faspex 5 Web Application provides high availability, node failover, and improved transfer performance with HSTS nodes sharing the transfer load.
Faspex v5.x was a major update to the web application, and the method to support this configuration has changed from v4.x and earlier.
This article contains links to Faspex 5 and HSTS Admin guide configuration steps where available and additional steps that are not covered in the Admin guides. Multiple HSTS Nodes are supported as of the Faspex_5.0.2 release. This configuration is valid on 5.0.2 or later releases. Pacgenesis recommends upgrading to the latest Faspex 5 release. You can find the most recent release of Faspex 5 here: https://pacgenesis.com/download/
HSTS Nodes Configuration/Requirements:
The minimum required HSTS version is 4.3. Pacgenesis recommends upgrading to the latest HSTS version available for download from the Pacgenesis download link provided above. In this blog a 2 node example is provided, however there is no theoretical limit to the number of HSTS nodes that could be configured. Each HSTS node needs its own file license; if you use entitlement licensing, the same entitlement can be applied to all nodes. The transfer user on the HSTS nodes need the same Faspex Package Path located on the same external storage device mount. The configuration does not load balance transfers between HSTS instances. You must use a network load balancer or IBM Aspera Proxy.
Here is a link to configure the HSTS Nodes. Follow Steps 1-13 on each HSTS node except for Step 7 (replacement step provided below).
Configuring a Linux node for Faspex
Replacement Steps 7 a-e: Run the following command replacing the example GUID: 40fc7051-2d61-4f6d-ad4a-2222a4bca28e (with any 20+ GUID of your own choosing). The same command including the same GUID should be applied across each HSTS Nodes being configured: #/opt/aspera/bin/asconfigurator -x “set_user_data;user_name,faspex;authorization_transfer_in_value,token; authorization_transfer_out_value,token;token_encryption_key,40f c7051-2d61-4f6d-ad4a-2222a4bca28e”
Continue Steps 8-13 to complete HSTS nodes configuration.
Faspex 5 Configuration:
Connect terminal session to the Faspex 5 Web application server:
Edit the following 3 files (core.yml, router.yml and service.yml) located at /opt/aspera/faspex/conf/docker_compose_templates
Add the following lines below the networks tag. Find this line in each file:
networks: [ docker_network ]
Add the below entries to all 3 files (core.yml, router.yml and service.yml). Make sure to replace the local IPs below with your actual local IPs. Additional hsts0X lines can be added if more then 2 nodes are being configured:

Once you have added these line additions to the 3 files, run Faspex setup. If setup was previously ran, it needs to be ran again to apply these new changes:
#faspexctl setup
Sign into the Faspex 5 web application (https://yourdns/aspera/faspex) as a user with Admin permissions:
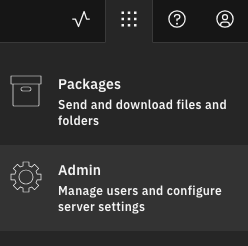
Select the 9 dot app switcher button in the upper right hand corner and go to the Admin app:
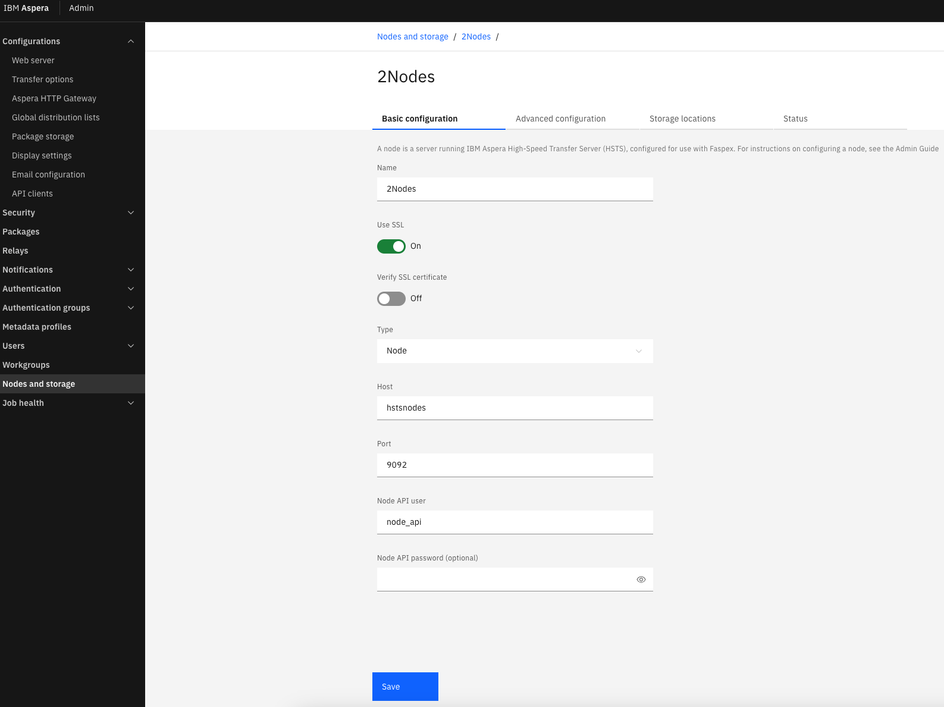
Under Nodes and Storage > Create node and fill in your HSTS Nodes Basic configuration. Then select “Save”. Note – the Host field should be hstsnodes as defined in the file entries applied above.
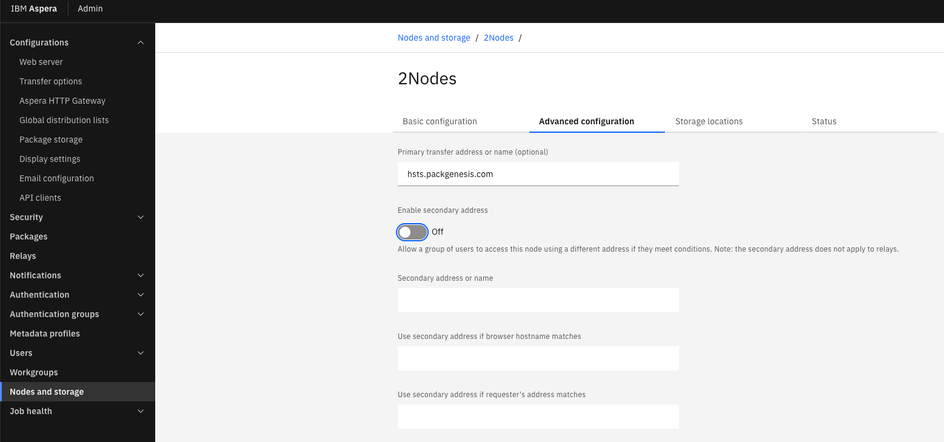
In the Nodes Advanced configuration tab fill in the “Primary transfer address or name”. This sets the HSTS server fqdn name that the clients will transfer packages to/from.
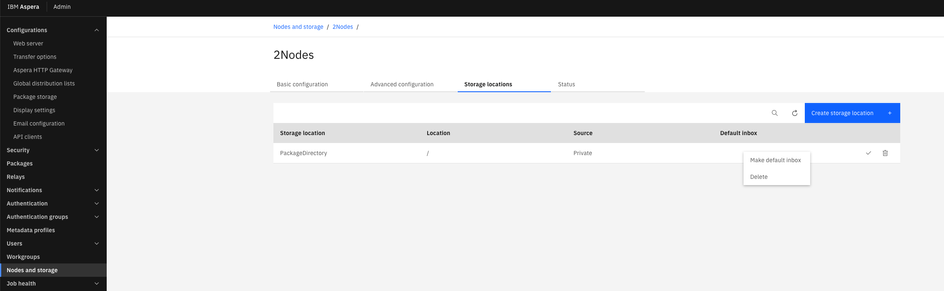
In the “Storage Location” tab > select “Create Storage Location” > Fill in the Friendly Name of the storage and “Browse” to the HSTS nodes shared storage FaspexPackages location and select “Create”.
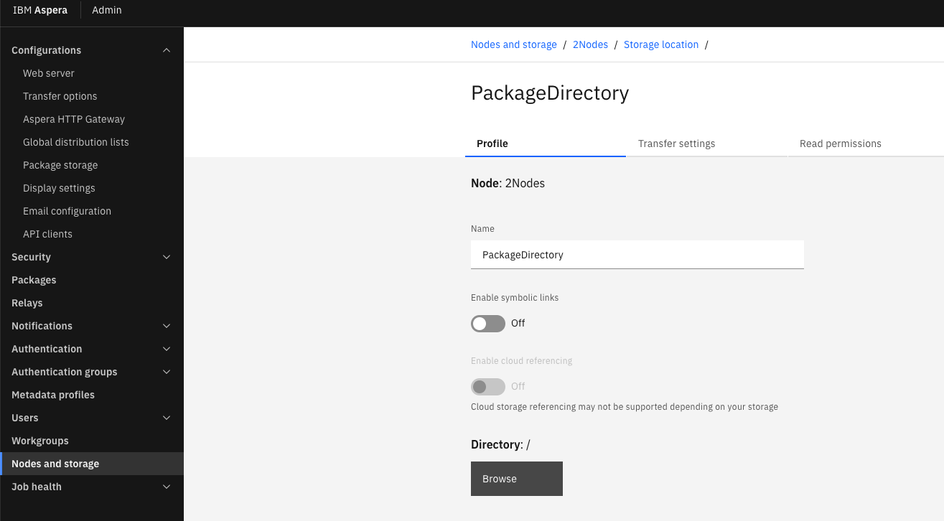
*Warning oft-missed stepIn the “Storage Location” tab right click on the Default Inbox column of the newly created storage and “Make default inbox”, once applied a storage location will display a yes in the “Default Inbox” column. Note without a default inbox selected, all package creation will fail.
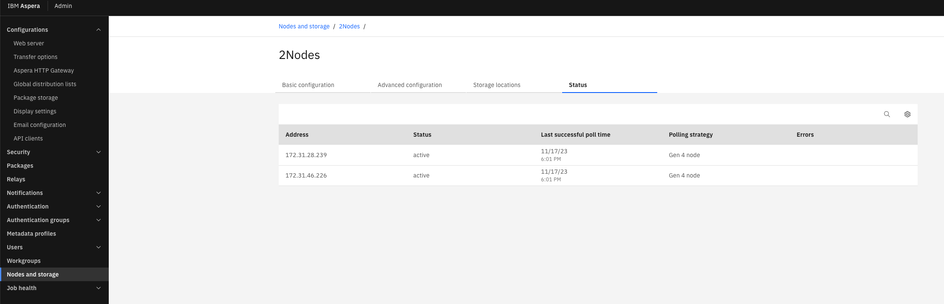
In the “Status” tab of the node. Confirm all HSTS Nodes display status of “active”.
You have successfully configured a Multiple HSTS Nodes Configuration.
In future upgrades these steps need to be applied to maintain multiple node configuration:
Edit the following 3 files (core.yml, router.yml and service.yml) located here /opt/aspera/faspex/conf/docker_compose_templates
Add the following lines below the networks tag. Find this line in each file:
networks: [ docker_network ]
Add the below entries to all 3 files (core.yml, router.yml and service.yml). Make sure to replace the local IPs below with your actual local IPs. Additional hsts0X lines can be added if more then 2 nodes are being configured:

Once you have added these line additions to the 3 files, run Faspex setup. If setup was previously ran, it needs to be ran again to apply these new changes:
#faspexctl setup
Additional Troubleshooting tools if needed:
On the Faspex 5 Server: Confirm that all the services are running by outputting the status the 3 this configuration change apply to are (faspex-core, faspex-router and faspex-service): faspexctl status
If there are errors or a service is failing to start you can check the logs to the related services like this: docker logs faspex-core docker logs faspex-router docker logs faspex-service
Or output them to file for sending logs to support like this: docker logs faspex-core > /path/to/file/faspex-core.log docker logs faspex-router > /path/to/file/faspex-router.log docker logs faspex-service > /path/to/file/faspex-service.log
Confirm that hstsnodes configuration is applied to each service (they should be listed as outputs from each of these calls): faspexctl run core “getent hosts” faspexctl run router “getent hosts” faspexctl run service “getent hosts”
Test with Curl through the services calling the the HSTS Nodes: faspexctl run core curl -ki node_api:password https://hstsnodes:9092/info